Set them up to work effectively for your students and you.
Google Classroom is a simple online learning environment. It is not full of features like some other learning environments are however the features it does have are flexible and can be quite powerful when used properly. Below I will discuss some of the things I do with Google Classroom in my classes. Depending on your level of experience and expertise with Google Classroom you will probably find that you are doing several of these things already but you never know, you may discover a little tweak you can make to your classes to make them just that little bit better for you and your students.
In setting up my Google Classrooms I am aiming for the following things :
All the tips below aim to work towards one or both of these goals.
Naming your class may seem like a trivial thing (and in many respects it is) however a little bit of thought here can make your life and that of your students easier. Both you and your students will no doubt have several classes on their Google Classroom main page and if your classes are named well then finding the class you want becomes just that little bit easier.
I won't offer advice here as every teacher / educational institution will be different in terms of their needs but you really should aim for consistency across your naming. Also think about what naming structure is going to be most useful for your students as well as you. (eg. Should you name your classes to match the naming on their timetable etc?)
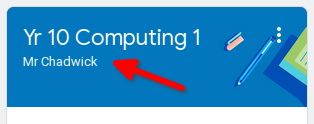
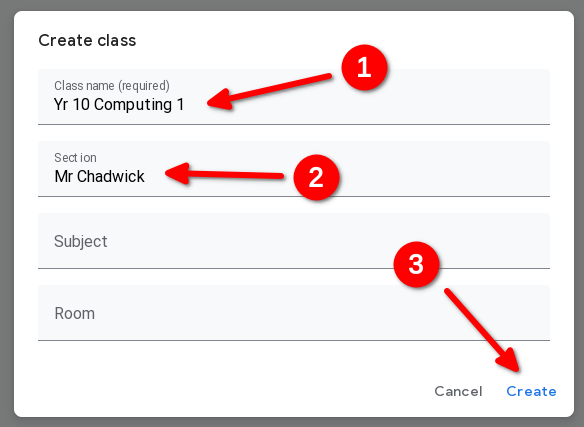 The other thing you can do which can be beneficial for your students is to make use of the Section field. In the listing of Classrooms the section will show up in smaller font just below the Classroom name. This can be useful to provide that little bit extra information for your students. I like to put my name there so they remember which teacher is teaching the class but it can be used for various other details too.
You could, for instance :
 You can change these details at any time too by clicking on the 3 dots in the top right and selecting Edit. Any existing classes can also be ammended if necessary.
 Set a different theme for each of your classes. This will help both you and your studetns in terms of identifying your classes on the listing of Classrooms. It also sends a message to your students that you care about the look and feel of your online presence.
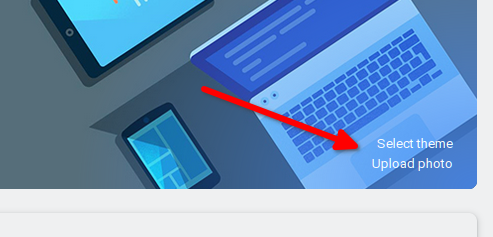
If you want to go even further then you can select a photo instead of one of the standard themes. This can be even better as it will then be unique and it will stand out more. Another very cool thing you can do (if you have a bit of ability graphically) is to make a picture as a collage of their great work.
To set the theme or photo click the links on the bottom right of the banner on the Stream page for your classroom.
Once you have your Google Classroom set up it's time to start thinking about the experience the students will have inside your class.
I see a lot of classes where everything is just posted to the Stream. In the short term this can be nice. It's quick and convenient for you as the teacher and the activity shows up at the top of the stream for the students so it is easy for them to find and access (at the time). The problem with this approach however is that all the material becomes difficult to access if you want to go back and find something from previously. It also doesn't give the students any structure to help them understand how all the material and activities build together into a coherent body of knowledge.
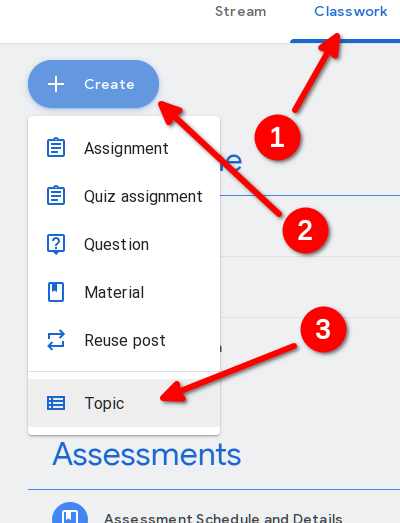 Using Topics we can change that.
Creating topics is quite easy :
You can use topics to break up your content in a variety of ways depending on the structure of your lessons.
Regardless of which approach you take I would also recommend adding a few other topics to help in terms of organisation :
You can create topics and they won't show for the students until there is at least one published item under the topic. This is nice as you can have them all set up and ready to go and they won't clutter up the students Classwork page.
The other nice thing about using topics is that you can reorder them quickly and easily. During normal class time I have the revision Topic at the bottom of the Classwork page so it's out of the way. Then as we approach exam time I move it up to the top. To reorder a topic simply click and drag on its name. (You can click and drag resources to reorder them within a topic and move them between topics as well.)
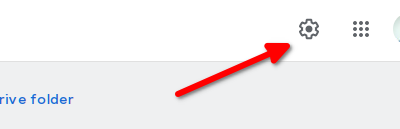 The next thing you want to think about is your class settings. There are various settings here you probably want to consider for your Class.
Access Class settings by clicking on the Cog in the top right of your class pages.
Manage invitation codes allows you to reset or turn off invitation codes. If you find students being silly and inviting others into your classrooms then turning this off once all your students are enrolled is a good idea.
Stream allows you to change whether students are allowed to post on the stream, comment on posts or do neither. By default students are allowed to post to the stream and you probably want to change it from this.
Show deleted items can be useful to turn on. Items here does not refer to assignments or material but comments that students make. This can be useful as students often think they can make silly comments then delete them before you see them. With this on the students will not be able to see the deleted comments but you will still be able to.
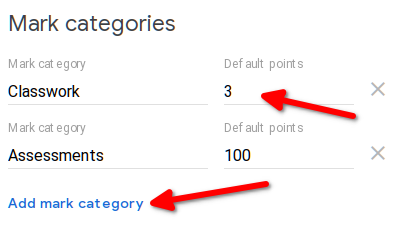 If you scroll to the bottom of the Class Settings page you will notice the section Marking and within this, Mark Categories. Creating a set of Mark Categories can make life easier later on when you are setting up marking for your assignments and class work. It will also then put a label on classwork so students know what is being marked and what isn't etc. The default points you set will be used when you create assignments.
These mark categories will also be shown on the Marks page and on exported marks spreadsheets which can help you separate out activities as well.
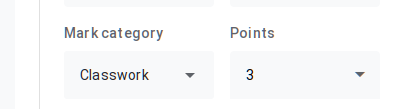 When you are setting up an assignment you will notice a new field appears in the right hand side menu, Mark Category. When you set this to the different categories the Points will automatically be updated to the points that you set for that category on the settings page.
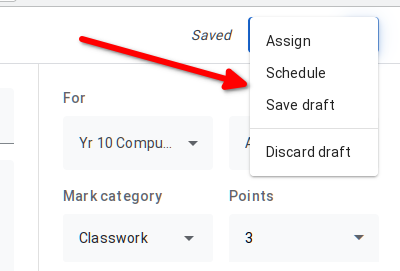 Another nifty way to get your learning material set up and ready to go beforehand is to make use of Drafts and Schedules. When you add resources (assignments, material, questions etc) you have the option to Save Draft and Schedule if you hit the drop down arrow next to Assign. If you use these options then you can get work set up and ready to release at a later time.
To access the options to schedule or save a draft click the little down arrow to the right of Assign in the top right of the screen.
Once you've scheduled or saved your draft you will be taken back to the Classwork page. Your scheduled and draft resources will show up in grey. You can see them as a teacher but the students won't see them until they are Assigned.
When you hover your mouse over the resources you will also see 3 dots show up on the right hand side. Clicking on this you get the option to Edit where you can Assign a draft (or scheduled item if you decide you need it early) or change the time for a scheduled release time.
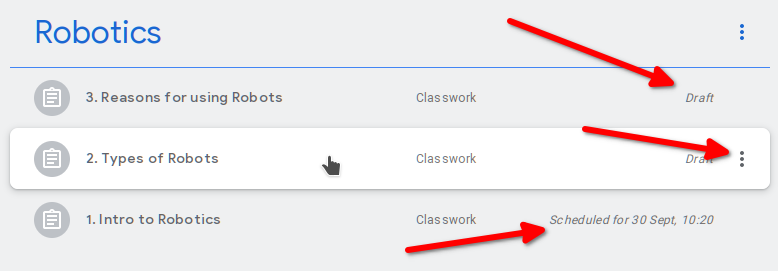
You will notice I have the activities listed in reverse order. This is so the most recently released resource will always be at the top and easier for the students to find with less scrolling.
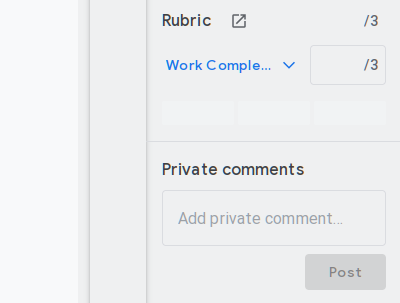
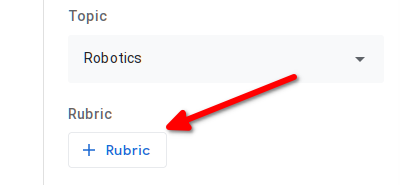 Rubrics make the task of marking a lot easier for you and also help to give your students a clear idea of how they will be marked.
To set up Rubrics you need to be in the Edit page for the Assignment.
When you set up your Rubric you have the option to Use Scoring or not. If you use scoring then the Rubric Criterions are each given a point value and they will then be added up to give the student their mark (which you can adjust independently if you want). If you select to not use Scoring then the Rubric will be present but won't set the students mark.
You should ideally set your rubric marks to add up to the same amount as the point value you set for the assignment. If they are different however, the marks will be scaled accordingly.
You can resuse Rubrics as well which can save you a lot of time. When you resuse a rubric a copy is made for the current assignment which means you can also edit it without affecting the original rubric.
It is also possible to alter the mark for a criterion or the grade as a whole when using the rubric to mark a students work. This can be useful if you just need to tweak a mark a bit. To do this simple click on the number you want to change and type in the new value.
Once you've got rubrics set up, marking student work within your classes is really convenient. At some point though you're probably going to want the marks moved into another markbook. You could just copy the marks out by hand but that is a lot of work. Thankfully there's an easier way.
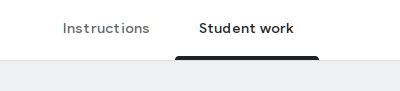 When you go into your Assignment activity, click over to Student Work. In the top right you will notice a cog. Clicking on it will give you several options to download marks. Even though you are in a specific activity, you will actually be downloading marks for all your activities for that class.
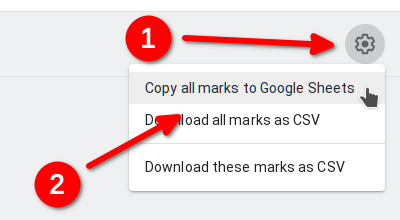 You may have been looking on the Marks page for this option (and it makes sense that it should be on the page where you are looking at all marks instead of just a single activity) but for some reason they have put the option on the page for an individual assignment?
If you want to open the marks in another product such as Excel then select Download all marks as CSV instead of Copy all marks to Google Sheets and then you can import the marks into any spreadsheet program.
 There are actually two ways that you can post comments for a student to their submission for as assignment (as a whole as opposed to within specific Google Docs). One of them allows you to edit / delete the comment, the other doesn't.
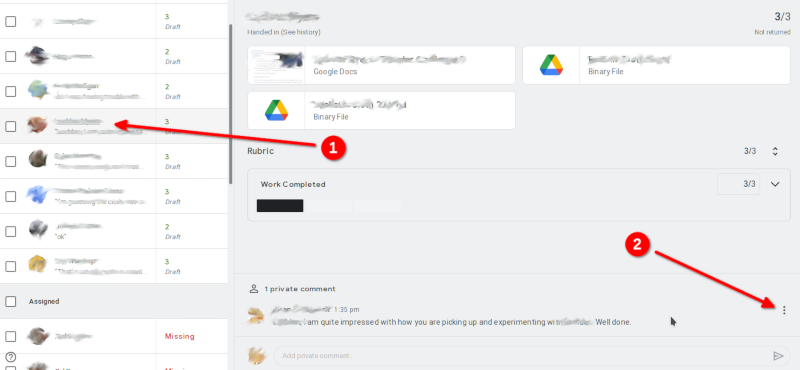
Most of the time you will be marking student work on the separate marking screen and it makes sense to use the Private comments area in the bottom right. Posting comments here is very convenient however there is no option here to delete or edit the comments. The same comments are also viewable back on the Student Work page for the Assignment if you click on their name on the left hand side listing rather than their submission on the main section. When you hover your mouse over a comment you will notice the 3 dots show up to the right of the comment. These will give you options to Edit and Delete the comment.
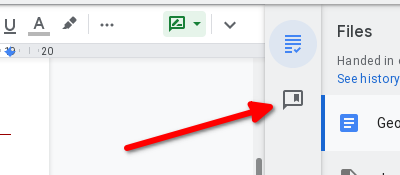 Often you will have the same comments you want to make (or variations on the same comment). The Comment Bank is a useful area to store these comments for easy access. The Comment Bank is accessible when you are in the separate marking screen.
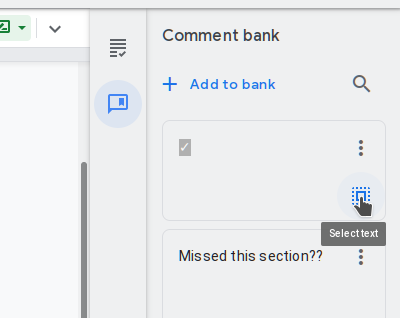
The Comment Bank is a little clunky in that you copy and paste the comments rather than just pressing a button to insert them but it can still save you a lot of time. You are not limited to just whole comments but can also have comment fragments that you can paste in then complete / modify. Emojis are also possible which can be a convenient way to comment.
 Here are some ideas for your comment bank to get you started but I'm sure you can add many more specific to your activities.
 There's a good chance that you're going to teach the same course / class again next year. The great thing here is that you can copy your Google Class and reuse it. All of your topics and resources will remain but they will all be set to draft and won't be published. This can save you a lot of time and means that all of that time and effort you put into creating an awesome experience for your students is going to pay off year after year after that.
Students, marks and comments are not copied over so it effectively creates a clean slate.
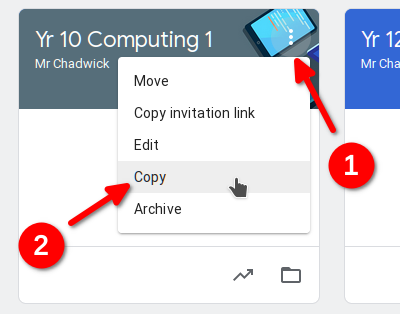
To copy a classroom all you need to do is go to the main classes page (with the listing of all your Google classrooms), click the 3 dots in the top right corner for the classroom you want to copy then select Copy.
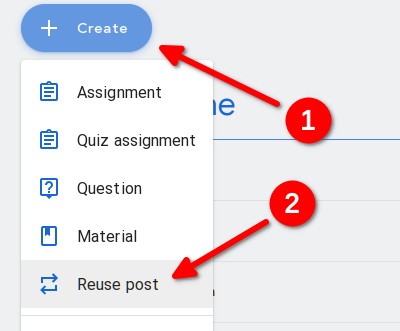 This can be a nice little time saver if you have a lot of activities that have a similar setup. You get the chance to change all the details / attached resources on the copied activity. This is most useful for Assignments and Questions.
When you copy an Assignment the marking scheme and other details (except for the due date) get copied across. You can even copy an activity from another class.
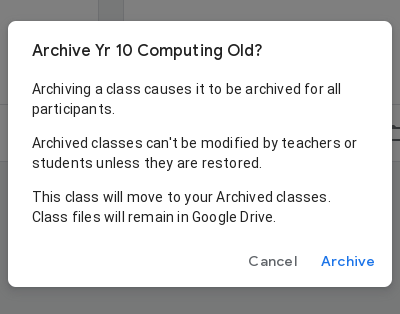
 Over time your Classes main page can get quite cluttered with previous Classes or classes that you no longer teach. You could delete them but this is not a good idea (you may want to go back and double check a mark given to a student, access and reuse a good activity you set up, copy the course in the future etc). Instead we can archive the Classroom. It is still there but you won't see it in your normal classroom listing.
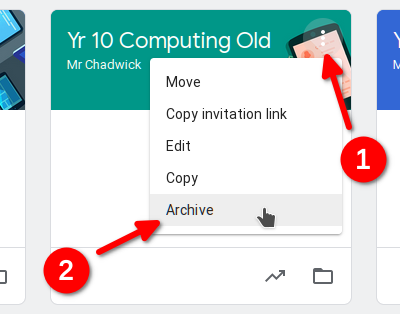
To archive a course is very simple. Go to the main Classes page (with the listing of all your Google classrooms), click the 3 dots in the top right corner for the classroom you want to copy then select Archive.
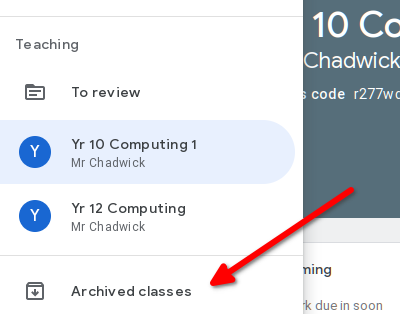 To view your archived classrooms you bring out the left hand side menu (three dashes in the top left) and click Archived Classes below your normal listing of Classes. This will bring you to a listing of your archived classes. If you want to bring back a class (maybe you accidentally archived it) you can easily do so by clicking the 3 dots in the top right corner for the class you want to restore then select Restore.
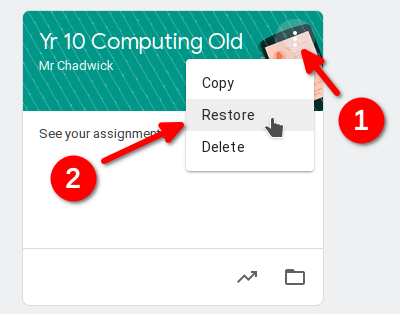 As you can see, you can also Copy archived classes. Copies of your archived classes show back up with your normal, unarchived classes.
 Your Classes page will normally list your classes in the order in which you created them. That is not normally the ideal order though. You can reorder your Classes very easily.
You can move an individual class by clicking on the 3 dots in the top right for that class and selecting move. This is a somewhat clunky means of doing this though. A much easier method is to just click and drag your class directly on the Classes page.
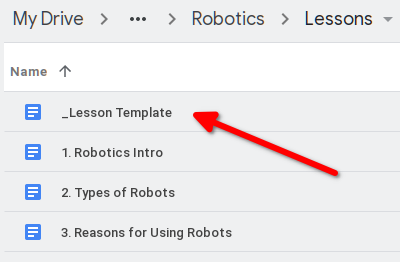 A good way to set up your lessons within your Class is to have them all as assignments set up as Google Docs. This way students can complete the work and submit it all within the browser and you can comment directly on their work. It's nice for the students if your worksheets are consistent. Setting up a template document which you copy in Google Drive for your worksheets can save you a lot of time and make your worksheets look more professional.
Here are some sample templates you are more than welcome to copy and adapt :
If you want to modify / create your own templates this page on Styling Google Docs may be beneficial.
Google Classroom is a simple yet quite effective Online Learning Environment. With a bit of thought put into how you set things up and utilising the right features, it can be a very useful and effective learning tool for both you and your students. Google constantly updates their products too so you should always be on the look out for new features that can make your experience even better still.
Education is the kindling of a flame,
not the filling of a vessel.
- Socrates


