


Algorithms : Decisions
Which to choose?
Introduction
 In the previous section we introduced the idea of algorithms and looked at the first basic structure which is sequence. In this section we will expand upon this and look at how we make decisions, also known as selection.
In this tutorial we will investigate two methods of algorithm description commonly used in software engineering :
- Pseudocode - a text based method
- Flowcharts - a graphical method
The two methods are comparable and have the same features. Anything you can represent in one, you can represent similarly in the other.
Binary Decisions
It is often the case that we want to perform an action but only under certain conditions.
IF condition THEN
processes
ENDIF
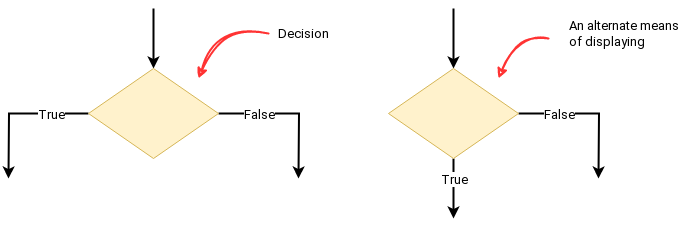
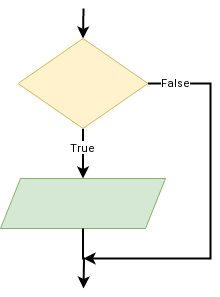
When doing flowcharts it is important to label the flow lines so it is clear which path is which.
Both methods of displaying a decision for flowcharts are valid. You may use whichever one you prefer. Think about which will make your diagram cleanest and easiest to read.
For instance, maybe there is a ride but you have to be over the age of 5 before you're allowed to go on it :
Binary Selection
- BEGIN
- Get age
- IF age > 5 THEN
- Display "Great, you can go on the ride"
- ENDIF
- Display "Enjoy your day"
- END
Notice that:
- The keywords IF, THEN and ENDIF are written in capitals.
- The processes inbetween are indented.
Indenting is important. It makes the structure stand out and improves readability.
 Here is the same algorithm as presented above but in flowchart :
Here I've made the decision to use the first style of layout as it keeps the shapes in-line and keeps the flowchart clean and easy to read. The alternate layout (with flowlines from either side of the diamond as opposed to one side and one down) would also be valid.
Now in the above example there is a process that either does or does not get run based upon if the condition is satisfied or not. Sometimes you want one set of processes to run if the condition is True and another set to run if the condition is False. For this we introduce the ELSE keyword.
IF condition THEN
processes
ELSE
processes
ENDIF
Let's take our example from above but expand it so that if the person is of age 5 years or under they get a different message :
Binary Selection with ELSE
- BEGIN
- Get age
- IF age > 5 THEN
- Display "Great, you can go on the ride"
- ELSE
- Display "Sorry, you are not quite old enough for the ride"
- ENDIF
- Display "Enjoy your day"
- END
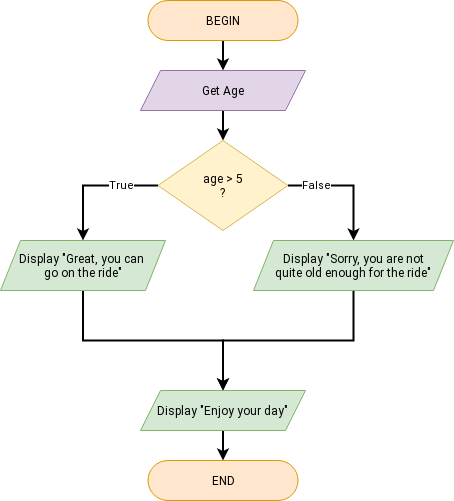 Here is the same algorithm as presented above but in flowchart :
Here I've made the decision to alter my flow arrows to go from either side instead of bottom and side as it balances the flowchart and improves readability. You could leave it in the previous style and it would still be valid however.
Conditions
So far the examples we have looked at have a simple condition, if the persons age is greater than 5 or not. We can be more complex in our conditions. We can use a range of operators, including logical operators.
Operators :
- = - is equal to
- < - is less than
- <= - is less than or equal to
- > is greater than
- >= is greater than or equal to
- != - is not equal to (sometimes written as <>)
In many programming languages we use == instead of = to ask the question of if two things are equal. In algorithms we can just use a single = however there is no harm in using two as well. Just be consistent in how you utilise them.
Logical operators :
- and
- or
- not
Condition example
- BEGIN
- Get age
- Get height
- IF age > 5 and height >= 80cm THEN
- Display "Great, you can go on the ride"
- ELSE
- Display "Sorry, you are not quite old enough or tall enough for the ride"
- Display "Maybe try a different ride that is more suitable"
- ENDIF
- Display "Enjoy your day"
- END
Some of you with programming experience may be looking at the above code and thinking that it should be height >= 80 (without the cm) as it would be entered as an integer. When implemented in code this is probably how it would be done and you can do similar in the algorithm if you like. It is perfectly ok to have the cm and can be beneficial as the purpose of an algorithm is to express the intended logic and to be as clear and easy to understand as possible. When the programmer turns the algorithm into functioning code they will make the necessary changes as they go.
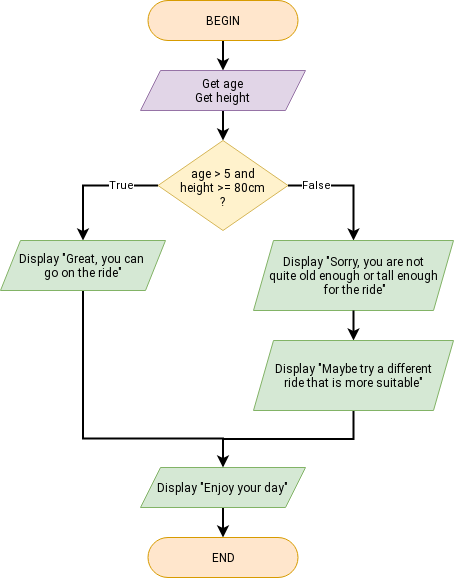 Here is the same algorithm as presented above but in flowchart :
Nested Decisions
Often there is more than one or two paths that we could take based upon multiple conditions. This is where Nested decisions come in. Only one group of processes will be run however we have more fine grained control over which set it will be.
IF condition THEN
processes
ELSEIF condition THEN
processes
ELSE
processes
ENDIF
You can have as many ELSEIF statements as you require. Once a particular condition is met the subsequent processes are run and then it jumps to the ENDIF and skips all other statements.
Let's say that if you are under 5 but have a height over 80cm you may go on the ride if your parent/carer gives consent :
Nested example
- BEGIN
- Get age
- Get height
- IF age >= 5 THEN
- Display "Great, you can go on the ride"
- ELSEIF height > 80cm THEN
- Display "You may go on the ride if your parent / carer agrees it is ok."
- ELSE
- Display "Sorry, you are not quite old enough or tall enough for the ride"
- Display "Maybe try a different ride that is more suitable"
- ENDIF
- Display "Enjoy your day"
- END
For the second condition we don't need to put age <= 5 and height > 80cm. It is fine just to have the second part of the condition as the first part is implied by the first IF statement being False if we get to this condition.
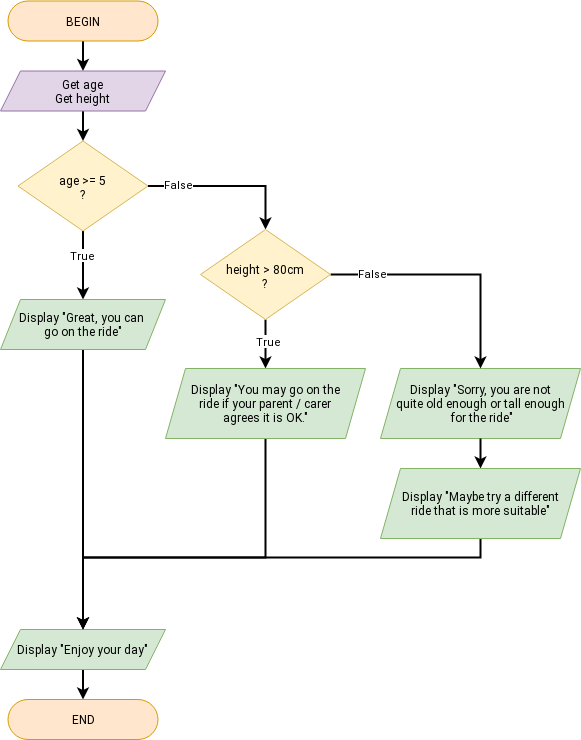 Here is the same algorithm as presented above but in flowchart :
As you can see here, flowcharts can very soon become quite large and unwieldly. This is one reason that people prefer to use pseudocode instead. They do, however, present the flow of the algorithm in a visual manner that can make understanding the logic easier when presented cleanly.
Here is another example. Let's say that if you are exactly 5 you may go on the ride but only if an adult is with you instead :
Nested example 2
- BEGIN
- Get age
- IF age > 5 THEN
- Display "Great, you can go on the ride"
- ELSEIF age < 5 THEN
- Display "Sorry, you are not quite old enough or tall enough for the ride"
- Display "Maybe try a different ride that is more suitable"
- ELSE
- Display "You may go on the ride if your parent / carer goes with you."
- ENDIF
- Display "Enjoy your day"
- END
We know that if the algorithm gets to the ELSE section then the person must be exactly 5 as they are not less than 5 and they are not more than 5.
When you are setting up nested decisions the conditions can often be in any order. Often, one particular order is nicer and more elegant than others.
Multiway Decisions - CASEWHERE
Sometimes you have a situation where there is one variable and you have multiple processes that may run based upon a series of possible values for that variable. This could be achieved with a nested IF statement however there is a shorthand method which is CASEWHERE :
CASEWHERE express evaluates to
value a : processes
value b : processes
value c : processes
OTHERWISE : processes
END CASE
The values may be exact items or can include operators such as > or <
Maybe we are creating a system to help a vehicle respond when approaching traffic lights :
Condition example
- BEGIN
- Get lightColour
- CASEWHERE lightColour is
- "red" : Set action to "stop"
- "amber" : Set action to "slow down"
- "green" : Set action to "continue"
- OTHERWISE : Set action to "proceed with caution"
- END CASE
- Display action
- END
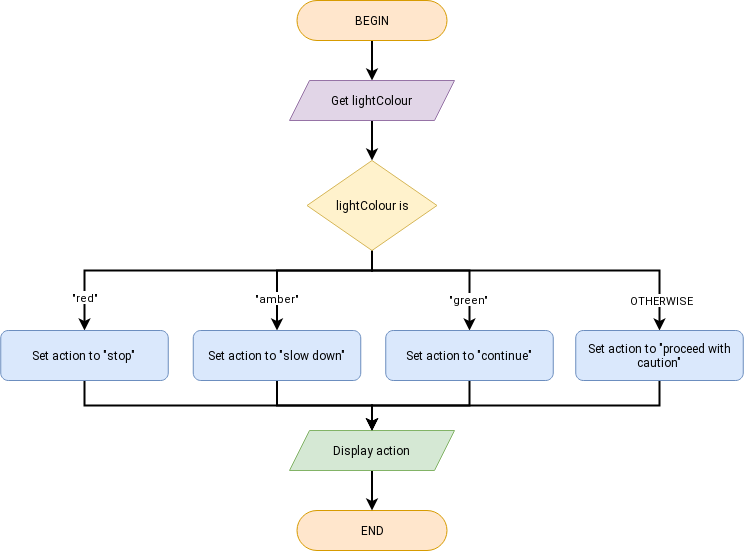 Here is the same algorithm as presented above but in flowchart :
Most of the time you will just have a single process after each value but it is possible to have several processes listed after a value. (you should generally try to set up your logic to avoid this, or use nested IF statements instead, however as it tends to hinder readability). Here is a similar algorithm but with the amber option expanded a bit :
CASEWHERE example
- BEGIN
- Get lightColour
- CASEWHERE lightColour is
- "red" : Set action to "stop"
- "amber" : Get distance to lights
- IF distance < 10 meters THEN
- Set action to "continue"
- ELSE
- Set action to "stop"
- ENDIF
- "green" : Set action to "continue"
- OTHERWISE : Set action to "proceed with caution"
- END CASE
- Display action
- END
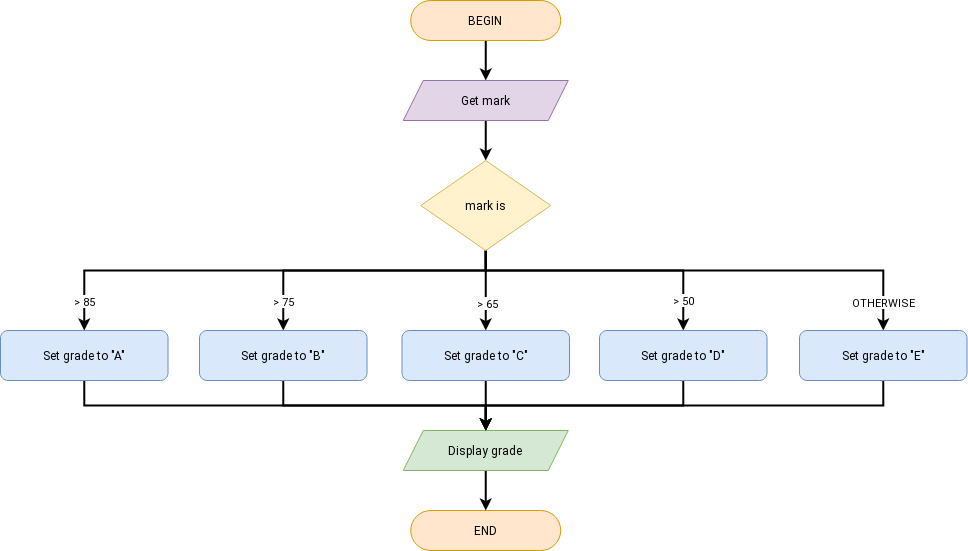
Now let's have a look at an example where we use ranges instead of specific values. In the algorithms below we will convert a students mark into a grade :
CASEWHERE example 2
- BEGIN
- Get mark
- CASEWHERE mark is
- > 85 : Set grade to "A"
- > 75 : Set grade to "B"
- > 65 : Set grade to "C"
- > 50 : Set grade to "D"
- OTHERWISE : Set grade to "E"
- END CASE
- Display grade
- END
The algorithm checks the condition for each case, starting from the top, and the first case which matches is the only case that gets run. As such, it is important to consider the order in which you put your cases. If we reversed them and put the case for "D" first, a mark of 90 would be given a "D" as it would check this case first and 90 is greater than 50.
Other examples
Here is a simple algorithm for calculating the area of a few shapes :
Calculate area
- BEGIN
- Get shape
- IF shape is "square" THEN
- Get side
- Set area to side x side
- ELSEIF shape is "rectangle" THEN
- Get side1
- Get side2
- Set area to side1 x side2
- ELSEIF shape is "circle" THEN
- Get radius
- Set area to Pi x radius x radius
- ELSE
- Display "Sorry, I am not able to calculate the area for that shape."
- Set area to 0
- ENDIF
- Display area
- END
Setting a variable
It is often the case that you want to set a variable as one of two values based upon a condition. An obvious way to do this is as follows :
Binary Selection Patern 1
- BEGIN
- Get level
- IF level > 10 THEN
- Set difficulty to "high"
- ELSE
- Set difficulty to "low"
- ENDIF
- Display difficulty
- END
This works nicely but there is another way we may approach this which is a little bit more compact :
Binary Selection Patern 2
- BEGIN
- Get level
- Set difficulty to "low"
- IF level > 10 THEN
- Set difficulty to "high"
- ENDIF
- Display difficulty
- END
It is minor, and both methods effectively work exactly the same, but some people believe the second method improves readability as it implies that difficulty of "low" is the default and will be changed under the right conditions.


